An online class requires an additional/different setup than a face-to-face class. Follow the navigation and steps below to set up the class as a fully online class.
NAVIGATION: Main Menu > Curriculum Management > Schedule of Classes > Maintain Schedule of Classes
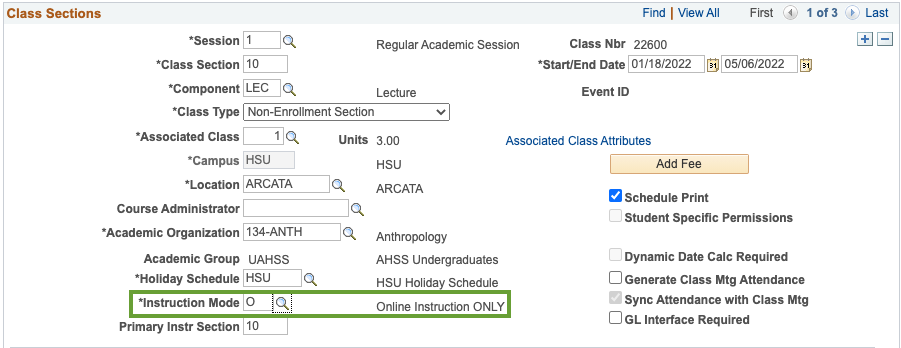
For all fully online classes, on the Basic Data tab, in the Instruction Mode field, enter (or select) the value of "O" (Online Instruction ONLY).
Scroll down to the Class Attributes section. Using the plus ("+") icon, add a new row and set up Course Attribute: FONL and Course Attribute Value: AB386.
IMPORTANT NOTE: Do NOT apply to independent study, thesis, and similar courses.

ASYNCHRONOUS class
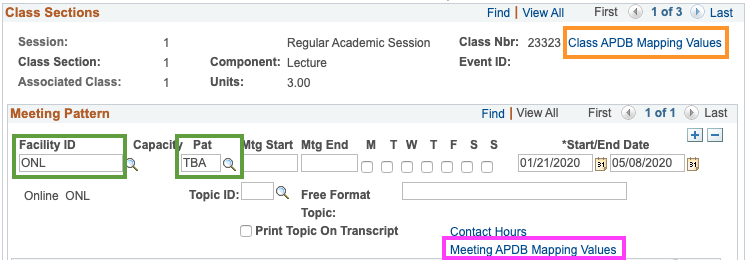
On the Meetings tab and follow the steps in the appropriate section for the asynchronous meeting pattern.
- enter ONL in the Facility ID field,
- enter TBA in the Pattern field,
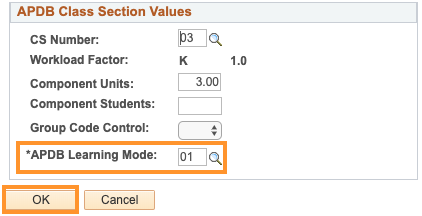
- next, click on the Class APDB Mapping Values link and in the APDB Learning Mode field enter 01 (or select this value from the list accessed via the magnifying glass lookup icon). Click on the OK button to return to the Meetings tab.
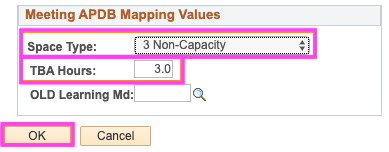
- lastly, click the Meeting APDB Mapping Values link and from the Space Type drop-down menu, select 3 Non-Capacity space type. In the TBA Hours field, enter the number of the hours for which the class meets each week. Click on the OK button to return to the Meetings tab.
SYNCHRONOUS class
Click on the Meetings tab and follow the steps in the appropriate section for the synchronous meeting pattern.
- enter ONL in the Facility ID field,
- enter the appropriate Pattern (the abbreviation for the day(s) of the week on which the class will meet online), Mtg Start and End times, Start/End Dates of the class,
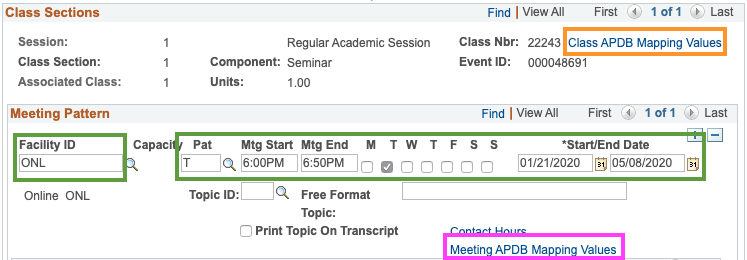
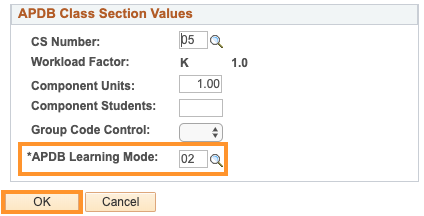
- next, click on the Class APDB Mapping Values link and in the APDB Learning Mode field, enter 02 (or select this value from the list accessed via the magnifying glass lookup icon). Click on the OK button to return to the Meetings tab.
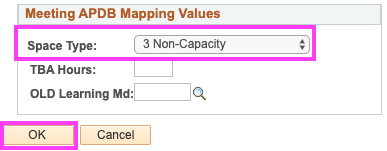
- lastly, click the Meeting APDB Mapping Values link and from the Space Type drop-down menu, select 3 Non-Capacity space type. Leave the other two fields blank. Click on the OK button to return to the Meetings tab.
Then Save the page using the button at the bottom of the page.